How to… Choose, Sharpen and Maintain Autopsy Knives
Dr Tristan Jubb – Livestock Health Systems Australia
Introduction
A razor sharp knife makes an autopsy quicker, easier and safer and results in better quality specimens. This article will provide information for veterinarians and animal health technicians on choosing autopsy knives and describe a freehand method of getting a knife razor sharp and keeping it that way. Free hand means not using machines or mechanical guides to control the sharpening angle – it’s an important skill when working in the field. Razor sharp means sharpness comparable to a razor blade – there are some tricks to getting this extra level of sharpness but it starts with choosing the correct type of knife.
Choosing a knife
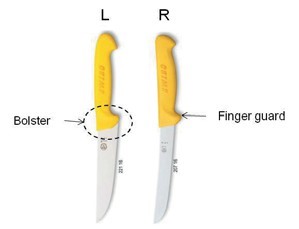
When choosing knives, get a skinning knife for the rough work involved in dismembering the carcass and a boning knife for the finer dissection of viscera and tissues samples (Figure 1). The brands I recommend are Swibo or Frederick Dick. This is because they have well thought out designs, very hard and corrosion resistant steel and are a reasonable price.
Shorter knives with blades 12.5 to 16 cm are easier to sharpen, store, and less fatiguing on the wrist than longer blades. They should have solid non slip plastic handles with a finger guard. Plastic is easier to disinfect than wood. The finger guard is the extra plastic moulded around the bolster designed to stop the hand slipping onto the blade (Figure 1).
Knives with straight spines like the Swibos shown in Figure 1 are easier to sharpen than those with curved spines.
Equipment
The equipment needed to sharpen a knife is minimal. Needed are:
- A double-sided diamond plate for grinding a new edge and honing;
- a double-sided hard-backed strop for stropping;
- a permanent ink marking pen for marking the bevel;
- a handheld magnifier to examine the edge;
- a non-slip mat to hold the diamond plate still;
- a tube of metal polishing paste to coat one side of the strop; and
- a woolen sock to protect the diamond plate and wipe clean the knives.
All but the strop can be conveniently stored in a medium size zip-up pencil case bag.
Diamond plates
Preferably use a large and wide double- sided diamond plate like the one shown in Figure 2 with fine 600 grit abrasiveness on one side and 1200 grit superfine abrasiveness on the other side. Sharpening will be quicker, easier and more accurate with diamond plates.
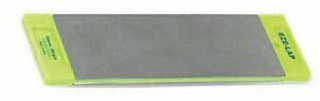
Good quality modern day knives have steel that is so hard that diamond plates with their greater cutting power are preferred to the softer aluminium oxide or silicon carbide stones. Good quality diamond plates, although more expensive, don’t break, chip or hollow out like aluminium oxide and silicon carbide stones, and will last a lifetime.
Use a piece of nonslip mat during sharpening to stabilise the plate and to protect the work surface.
Don’t use oil or water as a lubricant when using the diamond plates. The objective during sharpening is to remove metal. Lubricants work against this. Over time, accumulation of metal particles on the diamond plates will reduce abrasiveness. The particles (known as swarf) can be removed by brushing the stone with a stiff brush and hot, soapy water.
Sharpening
There are three main steps to achieve a razor edge.
- Grinding a new edge
- Honing the new edge to begin reducing the burr (using the 1200 grit side of the diamond plate).
- Polishing the edge by “stropping” to remove the remnants of the burr and polish the edge (using the double sided hard-backed strop first on one side with metal polishing paste and then the other side without paste).
The four main secrets to achieving a razor-sharp edge (and areas where most people go wrong) are:
- maintain a constant sharpening angle throughout the sharpening process,
- ensure that a new edge is formed by creating a burr along the entire edge (by grinding),
- remove the burr that forms each time a new edge is created (by honing), and
- progressively use increasingly finer abrasives until ultimately the edge is polished (by stropping).
Grinding a new edge
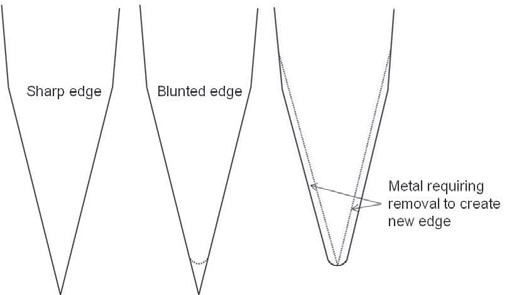
Use the 600 and then 1200 grit sides of the diamond plate to grind a new edge. Figure 3 shows where metal must be removed from the whole bevel if a new edge is to be created.
Maintaining a constant sharpening angle
Pick a bevel angle (also known as the sharpening angle and the edge angle) for your knife. Choose an angle of 10°-30° per side; shallower angles make a sharper edge that doesn’t last as long, steep angles are more durable. Most skinning and boning knives for veterinary use have a 15° edge angle, cleavers are 20° and hatchets are 30°. Select an edge angle that matches the type and extent of use the knife will receive. A 15°, 20°, or 30° edge or sharpening angle is achieved by raising the spine of the blade from horizontal by ¼, ¼3 and ½ of the blade width, respectively (Figure 4).

Maintaining a constant sharpening angle throughout the sharpening process is imperative. One of the main reasons for failure of freehand sharpening to sharpen knives is because a constant sharpening angle is not maintained. When sharpening knives in the field, the edge angle must be controlled by hand. Continuing practice will develop a well-formed perception of angles and the ability and “muscle memory” to maintain a constant sharpening angle during the different stages of sharpening.
The magic marker
To help identify and maintain the correct sharpening angle and ensure a new edge is established, use a permanent ink felt-tipped pen to mark the bevel along the entire length of the blade. This is called the magic marker. The recommended pen is the Artline 170 with its 2mm nib and instant drying Dry Safe ink which is ideal for metal. Examine the magic marker regularly while sharpening to ensure metal is being removed in the correct place at the correct angle and a new edge is being established.
Stroke action
Different stroke actions of the knife on a plate can be used ranging from circular to up-and-down to one- way. The most important thing to keep in mind is to select a stroke action that allows a constant sharpening angle to be maintained. A common mistake is instinctively raising the spine of the blade until it looks and feels like the edge is being worked thus constantly altering the sharpening angle. Larger edge angles and thicker bevels are created as time goes on and the knife blunts easily. To avoid this, instead of looking at the edge of the blade when sharpening, look at the spine to keep it at a constant elevation above the plate. This helps keep that constant sharpening angle. Do it throughout the entire sharpening process.
The following one-way technique is recommended for beginners because it is easier to maintain a constant sharpening angle. With experience, two-way or circular strokes can be introduced to speed up the sharpening process.

Place the diamond plate in front of you but along the edge of a table with the fine grit side upward and the long axis pointing away from you. Set and maintain the sharpening angle. Start sharpening the knife with it held perpendicular to the long axis of the stone and repeatedly push it away so that each time the spine is leading and the edge is trailing (Figure 5). Use firm strokes.
Continue grinding at this angle, concentrating on maintaining your selected sharpening angle, until your grind goes roughly halfway through the steel. Regularly check the erosion of the magic marker on the bevel as well as feeling for a burr to ensure that progress toward establishing a new edge is occurring. Turn the knife over and repeatedly draw the knife toward you, still with the spine leading and the edge trailing. Use firm strokes and continue grinding until a burr has been formed along the entire edge. Continue sharpening on alternate sides of the knife until you are satisfied that a new edge has been created in the middle of the steel. A burr should be present along the entire edge on the side opposite to that last grinded.
Magic marker should also have been removed on both sides of the edge (ie both bevels).
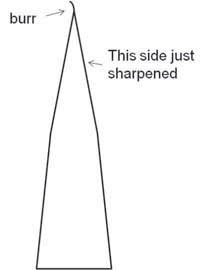
Burrs
A burr is the torn metal along the edge that steel naturally forms when one bevel is ground until it meets another. Removing metal along an edge always creates a burr. The burr forms on the edge on the opposite side of the bevel last sharpened (Figure 6). It is sometimes too small to see with harder steels but can be felt by drawing the thumb over and off the edge of the blade (Figure 7). If the edge catches the thumbprint when drawn off the edge on one side of the blade and not the other, a burr is present. Finer abrasives produce smaller burrs.
Once the magic marker has been removed and a new edge established, repeat the sharpening process on the super fine (1200) grit side of the diamond plate. Use the magic marker again as a guide to removing metal from the bevel in the correct place at the correct angle. Begin with firm strokes to remove the scratches from the 600 grit side. Do this on both sides of the new edge, then begin the honing process to start reducing the burr. Once a burr has been created, it must be removed otherwise it will break off during cutting and the knife will quickly become blunt. Not recognising and removing the burr is a common mistake.
Honing to reduce the burr
The use of the diamond plate to begin reducing the burr is called honing. Honing involves applying gentle pressure initially then gradually lightening off the pressure. Alternate sharpening on each side with light pressure until the burr can no longer be felt. Remember to maintain a constant sharpening angle.
After completing the honing stage, the knife should be serviceably sharp and shaving hairs off your arm may be possible. However, the edge will soon dull as the points on the microserrations of the edge after the 600 grit abrasive are still relatively large and prone to bending and breaking. A mildly grooved steel is usually necessary to keep the knife sharp for the duration of an autopsy. The next step of stropping uses finer abrasives on the edge, further reducing the size of the microserrations, resulting in a much sharper and more durable edge.
Polishing with a strop to remove remnants of the burr and polish the edge
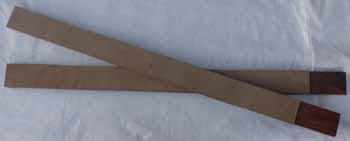
When sharpening on the diamond plate has been completed as judged by the edge looking and feeling very sharp, a further level of sharpness and durability can be obtained by stropping the edge on a hard-backed strop. A hard-backed strop is a length of straight flat wood on which a strip of leather or canvas has been glued (Figure 8). A double-sided hard back strop has leather or canvas on both sides.
The strokes on a strop are similar to the stroke on a diamond plate. Lead with the spine and trail the edge. Continue to use the same sharpening angle used on the diamond plate.

Stropping begins with first using a metal polishing paste which contains superfine metal-abrading particles, applied to one side of the double-sided strop, without the paste.
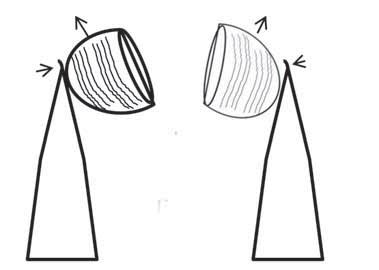
When the edge is pressed into the strop and dragged, the abrasive leather or canvas curves around the microscopic edge as shown schematically in Figure 9.
Stropping causes the microserrations of the edge, which are the last remnants of the burr, to become short and tightly and evenly aligned (Figure 10). This gives the edge superior sharpness and durability.
Using sharpening steels
Steels are unnecessary during the primary sharpening process if a strop has been used to finish the edge. Steeling will not sharpen the edge further and may even blunt the edge especially if a grooved steel is used. However, during an autopsy, the edge may become blunted – the microserrations along some sections of the edge can be bent over or broken off when they are pressed against bone, stone, glass, metal or other hard surfaces in or under the carcass. A smooth steel can then be used to stand up and realign these microserrations and recover a small amount of sharpness.
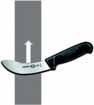
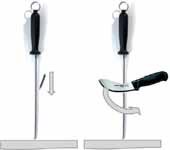
A finely grooved steel can be used but ideally a smooth steel should be used to stroke the edge lightly. Position the steel vertically with the end pressed into a flat stable surface (Figure 11) like the cutting board of the JBS1. This technique is simpler, safer and provides much more control over the sharpening angle than the in-the-air method (which is mainly done for theatre). Hold the steel firmly in the vertical position, and gently stroke the knife down while drawing it toward you; do one side of the steel then the other, concentrating on maintaining the sharpening angle of previous stages. Half a dozen light strokes on each side of the edge are usually sufficient.
Assessing sharpness
Test for sharpness using a consistent method each and every time.
» First, check that there is no burr. Do this by stroking your thumbprint off the edge along the entire edge on both sides of the knife. If burr is present, your thumbprint will catch on it.
» Next, lightly stroke the thumb pad onto the edge. A sharp edge can be felt catching on the fingerprint pattern. Tip – calibrate your thumbprint on the edge of a new scalpel blade occasionally.
» Finally, try shaving thin slices off the edge of a suspended piece of paper. A sharp knife cuts strips off the paper easily; a dull knife or a knife with nicks or burrs will tear the paper.
Protecting your equipment
Sheath knives in a plastic scabbard to protect the edges; don’t just keep them loose in a toolbox.
If storing knives, clean and dry the blade, especially the edge, to prevent blunting by micro corrosion eating away the teeth of the sharp edge.
Clean and dry steels thoroughly after use to prevent rust. Place with the handle down if storing in a JBS* to prevent corrosion of the end of the steel should moisture be present at the bottom of the bucket.
When not in use, pull a thick woolen sock over your diamond plate to keep it clean and protect the plastic frame and equipment that may be stored with it. It can be stored, along with most of the other items of your sharpening equipment (ie the magic marker pen, magnifier, non-slip mat, metal polishing paste but not the strop) into a pencil case.
Choosing a sharpening steel
Choose a sharpening steel with a plastic handle, an “O” ring, a hand guard and with the steel section being 25 to 30 cm long. Smooth steels are best if you are able to achieve razor sharp edges and they need a touch up during an autopsy.
Finely grooved steels are good for resurrecting serviceably sharp edges during an autopsy. Used gently, they realign bent microserrations; used forcefully they will remove metal and may sharpen a dull edge. They will set back a razor sharp edge unless used very lightly. Medium and coarsely grooved steels and diamond steels can remove a lot of metal and wear out a blade very quickly and can certainly set back a razor sharp edge.
*JBS – Jubb Bucket System, a commercially available autopsy kit from www.livestockhealthsystems.com